How to Enable and Moderate Comments on WordPress

Comment moderation is an important website management chore that all WordPress website administrator must carry out on a regular basis. The default comment system allows first visitor engagement and is an important aspect of retaining and growing subscribers to the blog.
How To Enable and Moderate Comments on WordPress
In this beginner’s guide, I will show how to moderate comments on a WordPress blog and deal with comment spam efficiently.
Comments in WordPress
Comments allow the readers of the website to interact with the author and with other readers through a very familiar interface. Users often use the comment section to voice their opinion on the particular blog, answer the queries of other readers and share relevant content that enhances the scope of the blog!
By default, commenting is enabled on a WordPress website. There are two ways in which users could comment on the website. Either, they could sign up on the website as a user or use one of their social profile to comment on the blog. On many blogs, both these methods are in effect through various plugins. The comment area comprises of a form that incorporates a text area and text editor. While the design of the comment area remains similar, the installed theme could also impact the appearance of the comment area.
The website moderator could either approve or disapprove a comment, thereby affecting the behavior of the users on the blog.
Moderate Comment on WordPress Websites
To moderate comments, website administrators have access to a special comments menu in the WordPress Admin Panel.
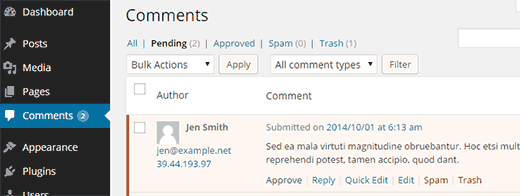
The Comments menu has the following four tabs;
- All comments
- Pending
- Approved
- Spam & Trash
The Pending tab has all the unmoderated comments that require your attention. Several action items allow you to approve or disapprove a comment. Select Approve and the comment will publicly become visible on the particular blog.
You can also reply to a comment by clicking the Reply action item and typing your response. Note that by replying, you are also approving the comment. Irrelevant comments could be marked as spam and moved to Trash.
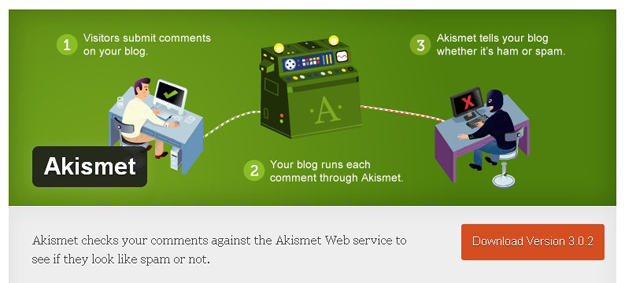
It is important to know how to identify a spam comment. According to a generally accepted definition, a spam comment:
- contains strange characters, keywords or links
- is often made by a fake profile
- is too generic
Spam is a global problem and WordPress comes with a pre-installed anti-spam WordPress plugin called Akismet that automatically stop suspicious comments at the source.
If you see a lot of spam comments in the Pending tab, simply navigate to the Spam tab and click the Check for Spam button.WordPress will run a spam check on the existing comments and Akismet, by default, will send spam comments from Pending to Spam.
By clicking Empty Spam button, you can delete spam comments completely. In addition, Akismet auto-deletes spam comments after 15 days.
A few remarks are so obviously spammed that you should directly send them to Trash by clicking the associated button. Comments in Trash are cleaned out automatically after 30 days. If you accidentally misclassified a comment, simply use the Restore action to correct the mistake.
Checking out Comments on Individual Posts
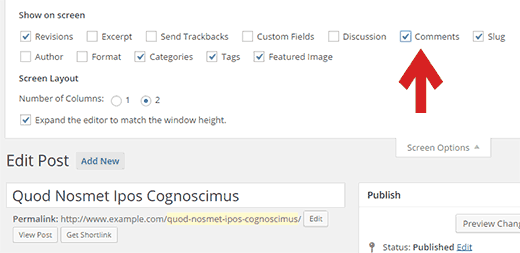
You can access all comments (approved and pending) on a post through the WordPress Post Editor. To do so, navigate to Posts > All Posts and select the Edit option below the post. To check all the comments made on the post, go to the bottom of the screen and find all the comments.
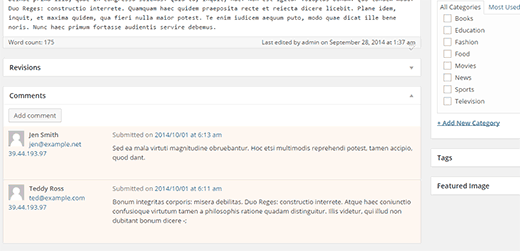
If you can’t see the comments at the end of your post, don’t freak out! Just click the Screen Options located on the top right corner of the Post Editor screen. This will bring a drop down menu. All you have to do is check the Comments box there, and you will see all the comments on the blog.
Turn Post Comments On/Off
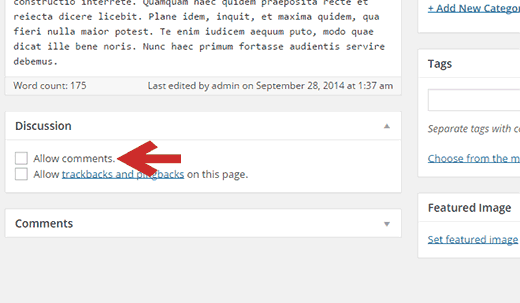
By default, comments are enabled on all post types. However, certain types of comments do not require a comments section. To disallow their views on a specific post, simply select the edit option on the post and in the post editor screen, hover down to the discussion metabox. Uncheck the Allow Comments box, and you are ready to go!
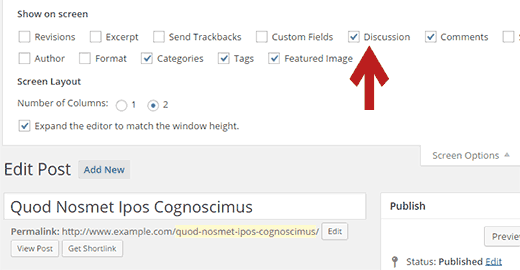
If you cannot see the option in the Post Editor, simply select Screen Options drop-down button located on the top right corner of the Post Editor. Check the box titled Comments.
Configuration Settings for Comments
The various configurations for comments could be accessed through Settings > Discussion. This page offers a number of options that directly impact the performance and appearance of comments on the website.
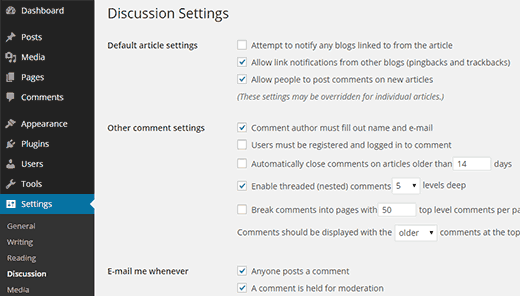
There are two major sections on this page. Options in these two sections could be enabled/disabled to change the appearance of the comments.
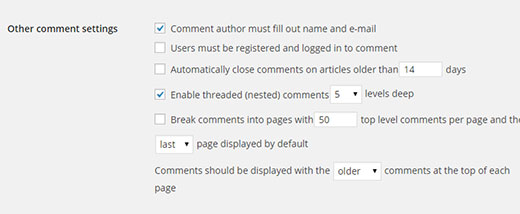
The Other comment settings have the following options:
- Comment author must fill out a name and email
- Users must be registered and logged in to comment
- Automatically close comments on an article older than (number) days
- Enable threaded (nested) comments (number) level deep
- Break comments into pages with (number) top level comments per page and the (last) page displayed by default
- Comments should be displayed with the (older) comments at the top of each page
The first option, if enabled, makes it mandatory for the comment author to provide the name and a valid email address along with the comment. This is a great way of restricting anonymous comments on the blog.
The second option, if enabled, will require users to register on the website before leaving a comment.
The third option, if enabled, will automatically close comments on previously published articles and blog posts on the site after a pre-set number of days. Once the period is over, commenting is automatically be disabled on the post.
The fourth option allows you to enable/disable threaded comments on your blog post. You can also specify the level of threads on individual comments. People generally leave this limit to default. However, this results in very messy comment threads.
The fifth option allows you to break comments into pages. This option should only be enabled if the blog or the page is popular enough to attract a huge number of comments.
The sixth option in your comments settings, if enabled, it allows the latest comment to have the highest priority By default, WordPress shows the newest comment at the bottom. You can reverse this to show new comments at the top.
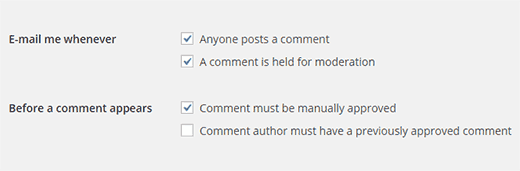
Other than that, two more options can be enabled. One is “E-mail me whenever” option that allows your website to automatically notify you when someone posts a comment or if a comment is held in moderation.
There is an additional “Before a comment appears” option through which you can enable/disable whether you want to manually approve a comment or specify whether a comment author has previously approved the comment or not. You can uncheck the second option to manually approve each comment on your website.
Comment Moderation Tips
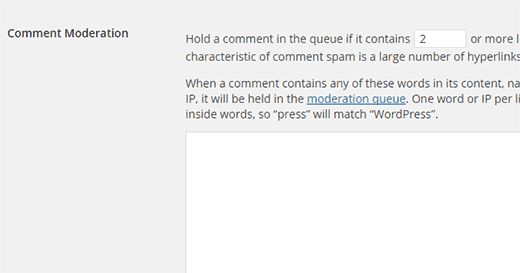
Spam comments are a huge problem that could be managed by manually approving all the comments. If you have enabled the check, all comments on the website will fall in the moderation queue. This will help you weed out spam comments easily.
Assuming that you have not enabled manual approval for comments on your website, you can simply set the number of links that can be allowed in a comment on your website. Any comment with the number of links exceeding the limit is automatically banned. You could also set up filters for IP addresses and email address that are not allowed to post comments on the website.
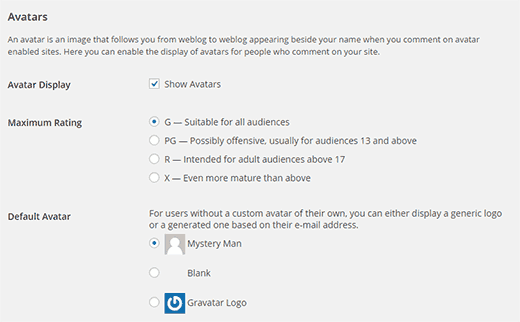
Avatars
All comments on the WordPress websites have Avatars in the form of small images that appear beside the name of the commentator. WordPress, by default, uses Gravatar a free service, that allows users to add specific avatar images to their profiles.
If a user has not set the Avatar, WordPress automatically sets a mystery man avatar. You can change this, by selecting a default avatar from the list or add your own custom default gravatar in WordPress.
So that’s all there is to WordPress Comments Moderation. I hope you find the information in this blog useful for moderating and managing comments on your WordPress.

Create Faster WordPress Websites!
Free eBook on WordPress Performance right in your inbox.

Moeez is ‘The’ blogger in charge of WPblog. He loves to interact and learn about WordPress with people in the WordPress community. Outside his work life, Moeez spends time hanging out with his friends, playing Xbox and watching football on the weekends. You can get in touch with him at moeez[at]wpblog.com.